Smoked Fish Pasta
You won’t see a “finished product” photograph for this dish. I had made the fish sauce ahead of time intending to gently reheat it and add to the pasta. My sisters were visiting and we were busy chatting so I asked my daughter to fill the pan on the cooker with water and turn on the burner under it. I had left an empty saucepan for the pasta on the cooker earlier. What could possibly go wrong?
My sweet, obliging child did what I asked and filled the pan with water, but not the empty pan, the one with the already cooked fish sauce in it. She turned on the burner as high as it would go. Well, from now on this dish will be known as “fish porridge” in our household. It still tasted okay, but it was definitely not photogenic!
I know fish and cheese is considered a big no-no by “proper” foodies, but we think this dish is really delicious and it is one of the few ways I can get my son to eat fish that hasn’t been battered, breaded or fried. You will need:
- An onion or a couple of leeks
- A glug of olive oil
- A clove or two of garlic
- About 250 g smoked white fish, skinless and boneless – haddock, pollock, cod whatever
- 500 ml milk
- Broccoli (or frozen peas, if preferred)
- Heaped tablespoon of cornflour (cornstarch in the US)
- A generous chunk of cheddar (250g or so)
- Salt and pepper
- Dried pasta (enough to feed your particular family) or rice, which works well with this sauce, too. And if you top the sauce with mashed potato, you have a fish pie.
Chop the onion or leek and put it in a large, deep frying pan with the olive oil and fry gently until soft. If using leeks be carful not to let them blacken as they will taste bitter.
While the onion is frying you can cut your broccoli into florets, pop them in a saucepan with water and cook until just tender. Drain and refresh under cold water and set aside.
Once the onion is soft, add the finely chopped garlic and fry very briefly (just until you can smell it) before adding the milk.
Put the fish fillets in the pan, add salt and pepper to taste and let simmer very gently until the fish is cooked through. This will not take long at all.
This tastes best when not overcooked, as does all fish, but if you get distracted or your daughter is helping out, it is not the end of the world if you overdo the fish here. Fish porridge may yet become a family favourite for you, too.
Mix the cornflour with some cold water and stir into the gently simmering milk. You could be fancy and carefully remove the fillets to a plate to keep them intact while you do this, but I can never be bothered. I stir very carefully and end up with biggish chunks of fish rather than whole fillets.
Once thickened slightly, add the grated cheese and the broccoli and gently stir together.
Taste for seasoning and serve poured over/mixed into cooked pasta or rice.
Roast Chicken with Veggies
I am sure you already have your own way of roasting chicken, and the only reason I am including this is to suggest it as a really easy all-in-one family midweek meal. A whole chicken can go a long way, doesn’t take very long to cook, is economical and a real crowd pleaser. I have yet to find a meat-eating child who can’t be tempted by at least some part of a chicken.
The vegetables I’ve chosen to go with this chicken are quite summery, because that’s when I was making it, but in winter I do the same thing with every single root that the bottom of the veg drawer in my fridge yields – sweet potatoes, swede, parsnips, even turnips. I find that cooking them under the chicken makes them so tasty that their true identity is disguised from pickier eaters and they get eaten up under the guise of the more innocuous “carrots and potatoes”. You will need:
- A free range chicken
- Two or three onions, peeled and cut into eighths
- Two or three cloves of garlic, peeled but left whole
- In summer, small carrots, scrubbed and left whole and new potatoes, scrubbed and left whole
- In winter, carrots, peeled and cut into chunks, potatoes, peeled and cut into wedges, plus any other root vegetables, also peeled and cut into chunks
- Olive oil
- A lemon
- Salt and pepper
- Dried herbs – I like tarragon with chicken, while oregano makes it taste like it comes straight from Greece or Italy.
Prepare your veg and spread them out in the bottom of a large roasting tin. Sprinkle with salt and olive oil.
Plonk the chicken on top
Cut the lemon in half and squeeze over the chicken, then put the squeezed out halves inside the chicken
Season the chicken well, sprinkle over herbs and a dash of olive oil.
Pour a cup of water into the roasting pan (not over the chicken as you don’t want to wash off the seasoning)
Put in the oven at 190 degrees C (375 degrees F) for 20 minutes. After 20 minutes, remove the pan from the oven. Turn the chicken over (upside down) and put back in the oven, and continue roasting. You will need to work out the overall time needed as follows: 20 minutes per 450g (1 lb), plus 10 to 20 minutes (test by inserting skewer into the thickest part of the chicken and the juices running out should be clear).
I have this theory that cooking a chicken upside down means that all the fat from the bottom bits, runs down during cooking and bastes the breast meat and keeps it moist. Probably a load of nonsense, but that’s why I do this.
Twenty minutes before the end of cooking, I take it out again, lift out the chicken, and shuffle around the veg so that the ones that were right under the bird can go to the edges to brown up a bit, and the browner ones can go under the bird so they don’t burn.
I added some broccoli florets around the edge of the chicken at this point, too. We also like roasted cauliflower with this.
Then put the chicken back, right side up this time, and finish it off.
Allow to rest about 20 minutes before carving and serving. Keep reading to find out what to do with the leftovers.
Ultimate Chicken Soup
You will think I am being ridiculous by including a chicken soup recipe that begins with making your own stock. How can I possibly call this “fuss-free” food? Well, firstly making chicken stock is really very easy, and secondly, it makes your chicken soup taste really, really good. That’s where the fuss-free bit comes in. I have never met anyone who makes a fuss about eating it. My veg-phobic teenage son eats gallons of it. It is probably the only reason he doesn’t have scurvy.
Of course, there is nothing stopping you using bought chicken stock. Making your own can be a bit time-consuming, I acknowledge.
 For the stock you will need:
- Roast chicken carcass, with all the bits of edible meat picked off and set aside
- An onion, roughly chopped, skin on
- A carrot, roughly chopped
- A couple of sticks of celery, roughly chopped
- A teaspoon of black peppercorns
- A bay leaf
- A tablespoon of dried herbs
- Salt
Put all of the items above in a large saucepan, add enough cold water to cover, and bring to a simmer. Let it simmer, with the lid on, for an hour.
Other recipes will tell you to skim the top and do other things to make lovely clear stock, but that doesn’t interest me. I simply tip it all into a sieve over a large heat-proof bowl and use the resultant bit-free liquid as my stock.
Now rinse and dry your big saucepan and make the soup. For the soup you will need:
- An onion or a couple of leeks
- Butter or olive oil
- Two potatoes, roughly chopped
- A variety of vegetables, roughly chopped — I use any that I happen to have to hand, such as cabbage, butternut, sweet potatoes, cauliflower, courgettes, green beans, swede, etc
- A tin of chopped tomatoes
- Chicken stock
- Leftover cooked chicken, roughly chopped
Put some oil or butter into your saucepan and add the chopped onions. Cook over a moderate heat until the onions have softened, but not blackened at all (bitter).
Add the potatoes and stir them around. Let them fry for a few minutes then add all the other veggies and let them fry for a bit.
Now add the can of chopped tomatoes. You can fill the empty can with water and swish it around before pouring the water into the saucepan. Let it all come to a nice bubble and then add the stock.
Put the lid on and simmer until all the veggies are very soft.
Remove from the heat and with a stick blender, whizz it all up until you have a smooth, creamy soup. If you don’t have a stick blender, you could transfer to a goblet blender or use a food processer, or even mash and whisk by hand if you are feeling very energetic.
Now add your bits of chopped, cooked chicken. Taste for seasoning, and then reheat very gently until the chicken bits are warmed through. Don’t boil.
This stuff tastes just lovely, and you can rest easy knowing that your family are probably getting their entire daily vegetable quota in a large bowlful.
Hedgehogs
Growing up in South Africa, my mom used to make these and called them porcupine meatballs. When I started making a version of them for my British children, we rebranded them as the more geographically appropriate hedgehogs. We get some funny looks when I answer “hedgehogs” to the “what’s for dinner?” question.
My siblings will be surprised (and perhaps dismayed) to find that the list of ingredients in my version of this recipe does not include a tin of cream of tomato soup. I have done some tweaking to suit myself, but feel free to try it with the soup instead of the passata. Use one tin of soup, but add enough water to bring the total liquid up to 500ml. Omit the worcestershire sauce and sugar.
You will need:
- 400g minced beef
- A large onion, finely chopped
- Half a cup of rice (I use basmati)
- 500ml passata
- A tablespoon of Worcestershire sauce
- A dessertspoon of sugar
- Salt and pepper
Put the passata, sugar, Worcestershire sauce and some salt into a saucepan. Put the lid on and bring to the boil over a medium low heat.
While the liquid is heating, put the mince, onion, rice, salt and pepper into a mixing bowl. Use your hands to mix it all together really well and then form it into little balls. The same size as those little Swedish meatballs is ideal.
Once the liquid is bubbling, gently drop the balls into the saucepan (don’t splash). When all the balls are in, give the liquid enough time to return to a bubbling boil, then put on the lid and turn down the heat really low.
After 30 minutes, the liquid will be absorbed and the rice will be soft and the balls cooked through. Lovely served with butternut and green beans.
Crunchies
Growing up, there was always a tin of these oat crunchies in the kitchen. Now I bake for my own children, I realise why they were my mom’s go-to cookies. Firstly, they require very little equipment to make and therefore very little washing up afterwards — a saucepan, a wooden spoon and a baking tin — that’s it. Secondly, you won’t need the recipe as the ingredients and quantities are so easy to remember. Thirdly, although they look kind of healthy, they are also quite naughty (plenty of sugar) so your kids will greet your baking efforts with “Yum, crunchies!” instead of “Yuck. What’s that?” And finally, they do actually contain quite a bit of “good for you” stuff, such as oats, coconut and raisins, so you can treat your kids and still feel a bit smug. You will need:
- 225g butter (or margarine if you want to make them vegan)
- 2 tablespoons of golden syrup
- 1 teaspoon bicarbonate of soda
- 2 cups oats
- 2 cups dessicated coconut
- 2 cups flour
- 1 cup sugar
- half a cup of raisins (optional)
That quantity of butter may seem a bit annoying — just a bit less than a 250g block. That’s because this recipe has been translated from imperial measurements and that is what half a pound turns out to be in grams. I just hack a bit of butter off the block and use it to grease the baking tin, then bung the rest into the crunchies. Works fine.
Start by greasing a baking tin that is at least a couple of centimetres deep. A large shallow tin will make more, thinner crunchies, which will need a shorter cooking time. A deeper smaller tin, such as a traybake tin, will make fewer, fatter ones that will need to be baked for a bit longer.
Put the butter and golden syrup into a big, heavy-bottomed saucepan. Place on a low heat until the butter melts.
Remove from heat and stir in the bicarb.
Put all the dry ingredients into the saucepan and mix really well. You will have quite a crumbly mixture.
Tip the mixture into the prepared baking tin and press it all down evenly.
Bake in a moderate oven for 20-25 minutes or until lightly coloured.
Remove from the oven and cut into squares. Then leave to cool in the tin.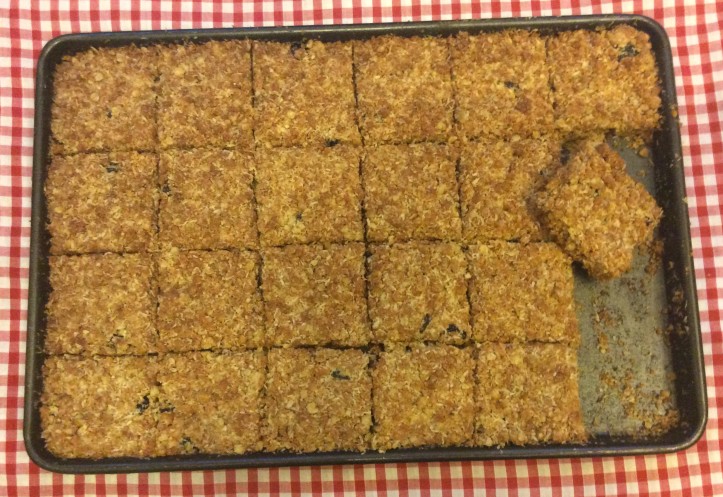 Job done.

Yay, fish porridge for supper tonight. Also can’t wait to try the hedgehogs without the can of tomato soup. Fuss free food at it’s very best!
LikeLike